How to Do Leopard Nail Art
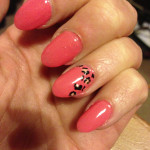
I’m not ashamed to say I love leopard print, Bet Lynch eat your heart out, but I don’t always want full on leopard all the time. This is a nice way to inject just a touch of leopard into everyday life. This nail art is super simple, all you need is a normal polish (this is Rose Pink from Rimmel) plus nail art pens in two different colours (I’ve gone for nude and black, the black is Model’s Own/Wah Nails and the nude is a generic one off eBay. The Model’s Own pen draws a finer line so is good for this.)
1. First start by painting your nails with the main colour – I always use a base coat and a top coat (when done) as I find the polish lasts longer but it’s up to you! I needed two coats of the pink for even coverage.
2. Next I used the nude pen to add four or five dots along the edge and bottom of the nails on each of my ring fingers. These form the centre of the leopard spots so make sure you give yourself enough space to add the black detail. Leave to dry
3. Once dry draw a slightly wiggly line around three quarters of one of the spots creating a ‘u’ or ‘c’ shape, repeat for one of the other spots but have the opening facing a different direction. You can repeat this for all or, as I’ve done, add a couple of more irregular ones in with lines on each side of the dot. Make sure that you keep the design in line with the general curve around the nail.
4. Once all the dots have been outlined fill any gaps in the pattern with small irregular black lines or dots. Leave to dry and add top coat if desired!
There you have it, just a touch of your wild side showing through! Obviously the same principle can be applied if you wanted the whole nail to be leopard print, just make sure you don’t go overboard on the dots and leave enough space to draw on the markings.
You May Also Like